Issue Boards
Overview
The GitLab Issue Board is a software project management tool used to plan, organize, and visualize a workflow for a feature or product release. It can be used as a Kanban or a Scrum board.
It provides perfect pairing between issue tracking and project management, keeping everything in the same place, so that you don't need to jump between different platforms to organize your workflow.
With GitLab Issue Boards, you organize your issues in lists that correspond to their assigned labels, visualizing issues designed as cards throughout that lists.
You define your process and GitLab organizes it for you. You add your labels then create the corresponding list to pull in your existing issues. When you're ready, you can drag and drop your issue cards from one step to the next.
Watch a video presentation of Issue Boards (version introduced in GitLab 8.11 - August 2016).
Advanced features of Issue Boards
With GitLab Starter, you can create multiple issue boards for a given project. (STARTER)
With GitLab Premium, you can also create multiple issue boards for your groups, and add lists for assignees and milestones. (PREMIUM)
Check all the advanced features of Issue Boards below.
How it works
The Issue Board builds on GitLab's existing issue tracking functionality and leverages the power of labels by utilizing them as lists of the scrum board.
With the Issue Board you can have a different view of your issues while maintaining the same filtering and sorting abilities you see across the issue tracker. An Issue Board is based on its project's label structure, therefore, it applies the same descriptive labels to indicate placement on the board, keeping consistency throughout the entire development lifecycle.
An Issue Board shows you what issues your team is working on, who is assigned to each, and where in the workflow those issues are.
You create issues, host code, perform reviews, build, test, and deploy from one single platform. Issue Boards help you to visualize and manage the entire process in GitLab.
With Multiple Issue Boards, available only in different tiers of GitLab Enterprise Edition, you go even further, as you can not only keep yourself and your project organized from a broader perspective with one Issue Board per project, but also allow your team members to organize their own workflow by creating multiple Issue Boards within the same project.
Use cases
There are many ways to use GitLab Issue Boards tailored to your own preferred workflow. Here are some common use cases for Issue Boards.
Use cases for a single Issue Board
GitLab Workflow allows you to discuss proposals in issues, categorize them with labels, and from there organize and prioritize them with Issue Boards.
For example, let's consider this simplified development workflow:
- You have a repository hosting your app's codebase and your team actively contributing to code
- Your backend team starts working a new implementation, gathers feedback and approval, and pass it over to frontend
- When frontend is complete, the new feature is deployed to staging to be tested
- When successful, it is deployed to production
If we have the labels "backend", "frontend", "staging", and "production", and an Issue Board with a list for each, we can:
- Visualize the entire flow of implementations since the beginning of the development lifecycle until deployed to production
- Prioritize the issues in a list by moving them vertically
- Move issues between lists to organize them according to the labels you've set
- Add multiple issues to lists in the board by selecting one or more existing issues
Use cases for Multiple Issue Boards
With Multiple Issue Boards, available only in GitLab Enterprise Edition, each team can have their own board to organize their workflow individually.
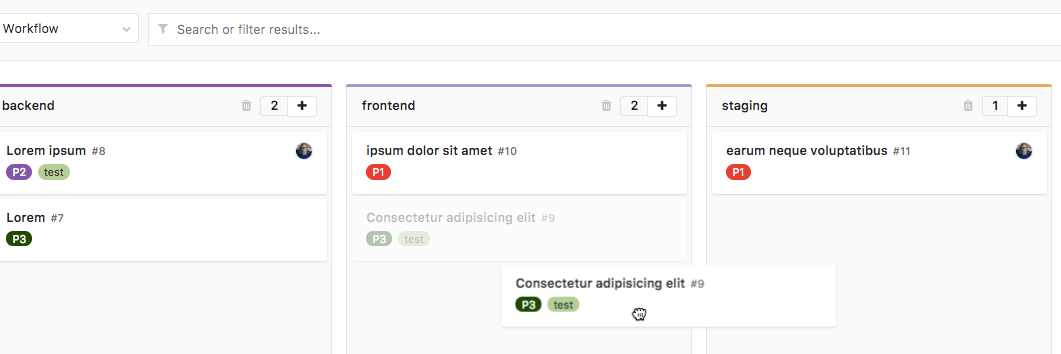
Scrum team
With Multiple Issue Boards, each team has one board. Now you can move issues through each part of the process. For instance: To Do, Doing, and Done.
Organization of topics
Create lists to order things by topic and quickly change them between topics or groups, such as between UX, Frontend, and Backend. The changes will be reflected across boards, as changing lists will update the label accordingly.
Advanced team handover
For example, suppose we have a UX team with an Issue Board that contains:
- To Do
- Doing
- Frontend
When done with something, they move the card to Frontend. The Frontend team's board looks like:
- Frontend
- Doing
- Done
Cards finished by the UX team will automatically appear in the Frontend column when they're ready for them.
NOTE: Note: For a broader use case, please see the blog post GitLab Workflow, an Overview. For a real use case example, you can read why Codepen decided to adopt Issue Boards to improve their workflow with multiple boards.
Quick assignments
Create lists for each of your team members and quickly drag-and-drop issues onto each team member.
Issue Board terminology
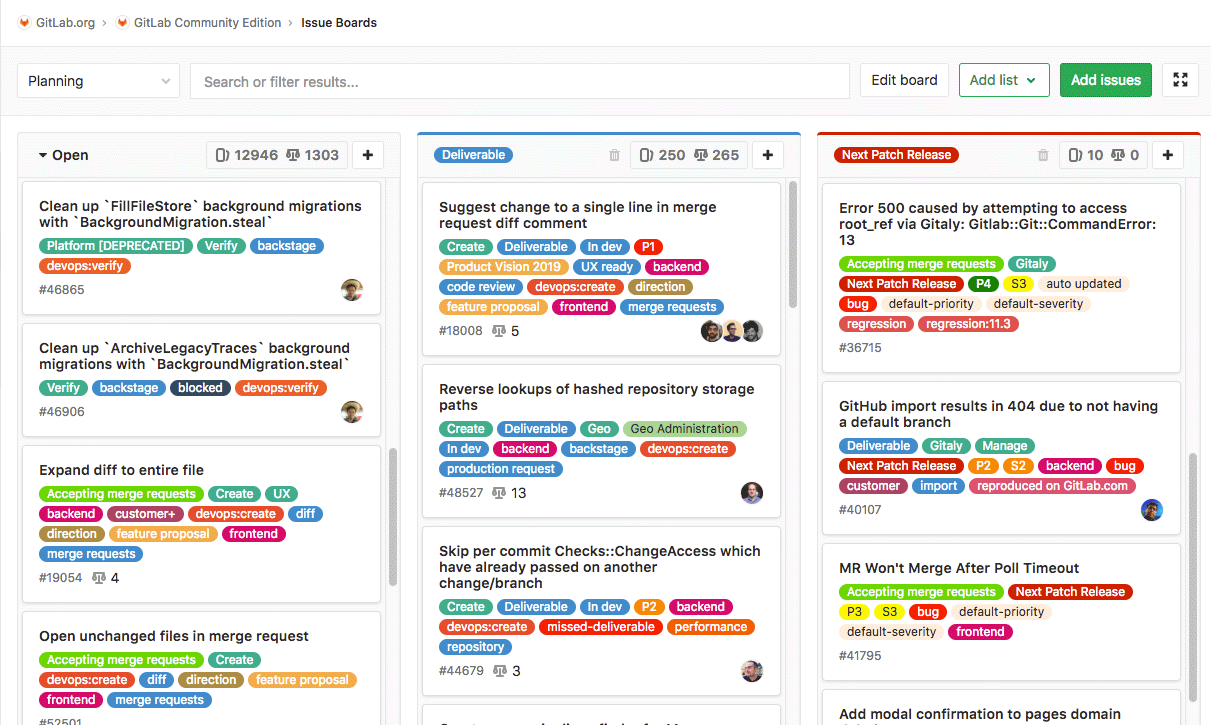
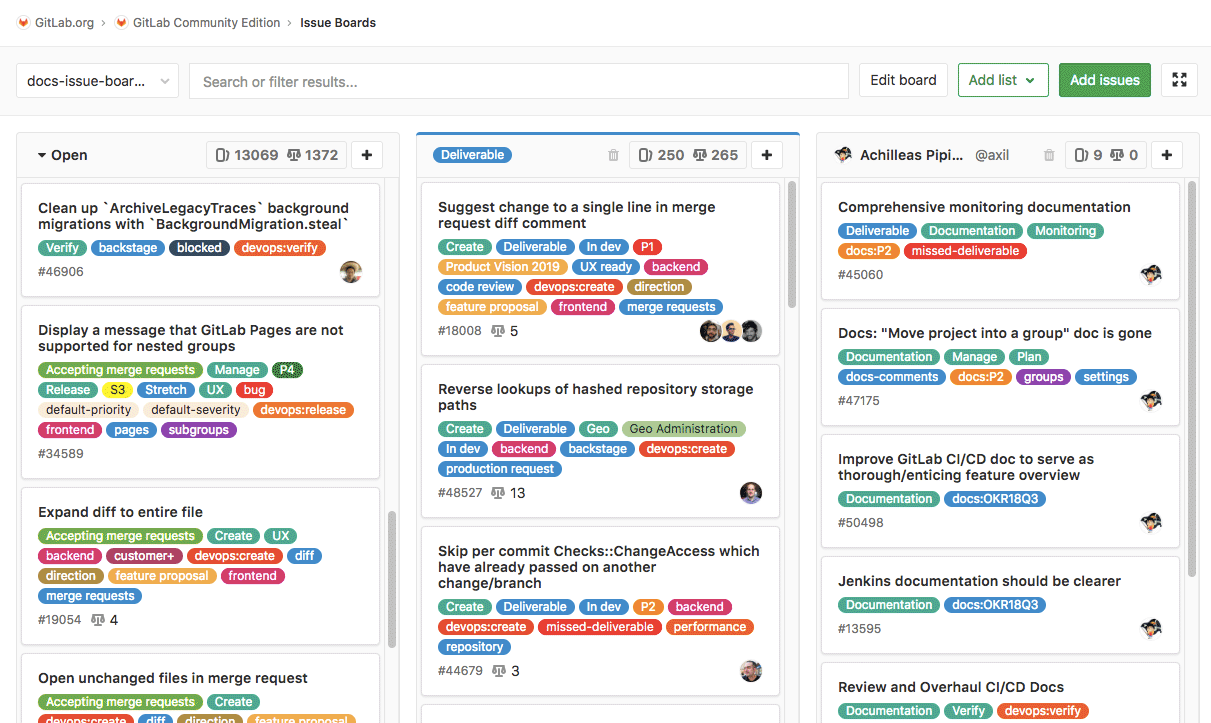
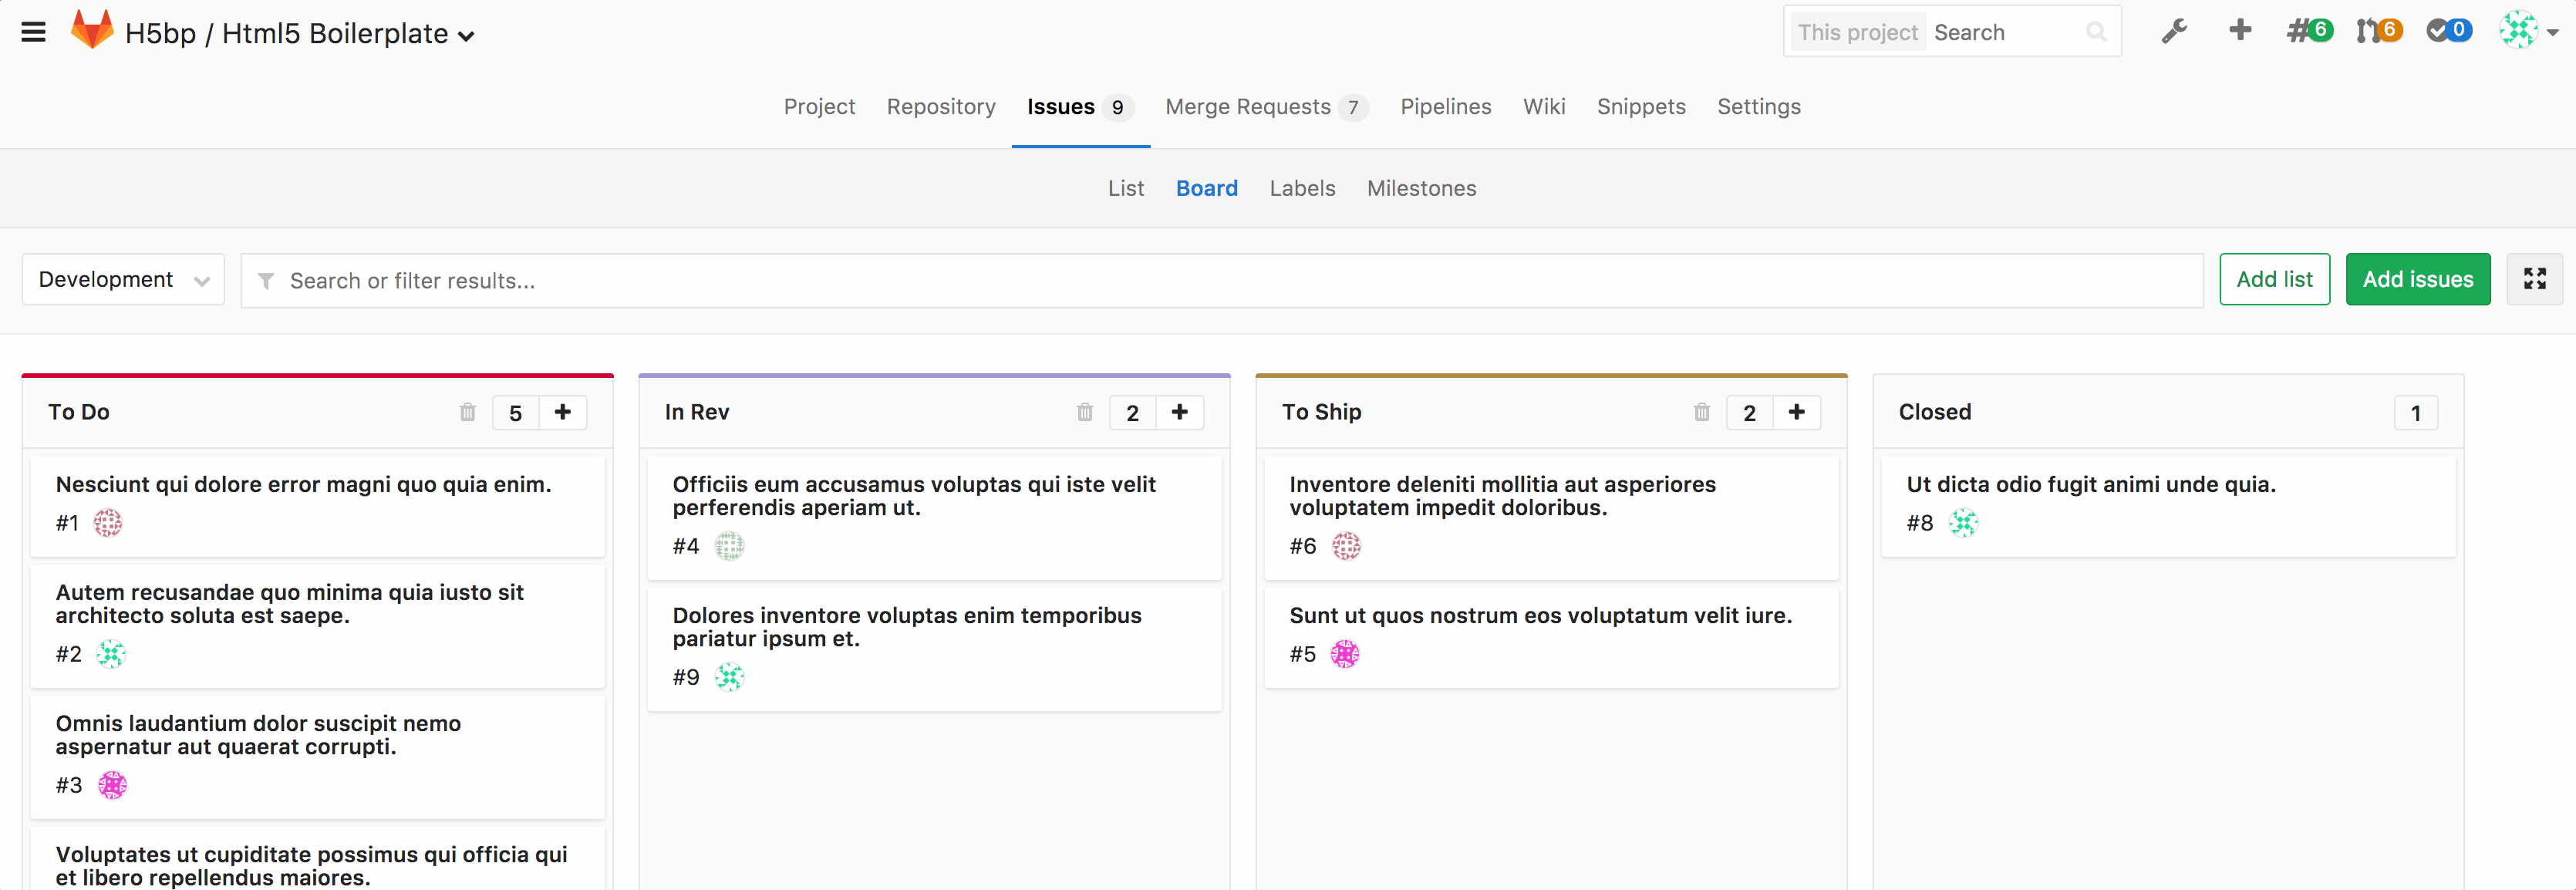
- Issue Board - Each board represents a unique view for your issues. It can have multiple lists with each list consisting of issues represented by cards.
-
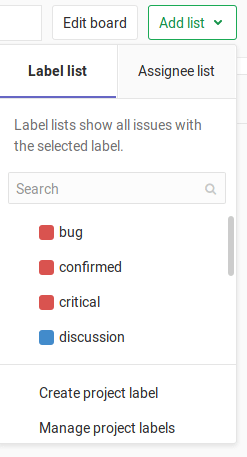
List - A column on the issue board that displays issues matching certain attributes. In addition to the default lists of 'Open' and 'Closed' issue, each additional list will show issues matching your chosen label or assignee. On the top of that list you can see the number of issues that belong to it.
- Label list: a list based on a label. It shows all opened issues with that label.
- Assignee list: a list which includes all issues assigned to a user.
- Open (default): shows all open issues that do not belong to one of the other lists. Always appears as the leftmost list.
- Closed (default): shows all closed issues. Always appears as the rightmost list.
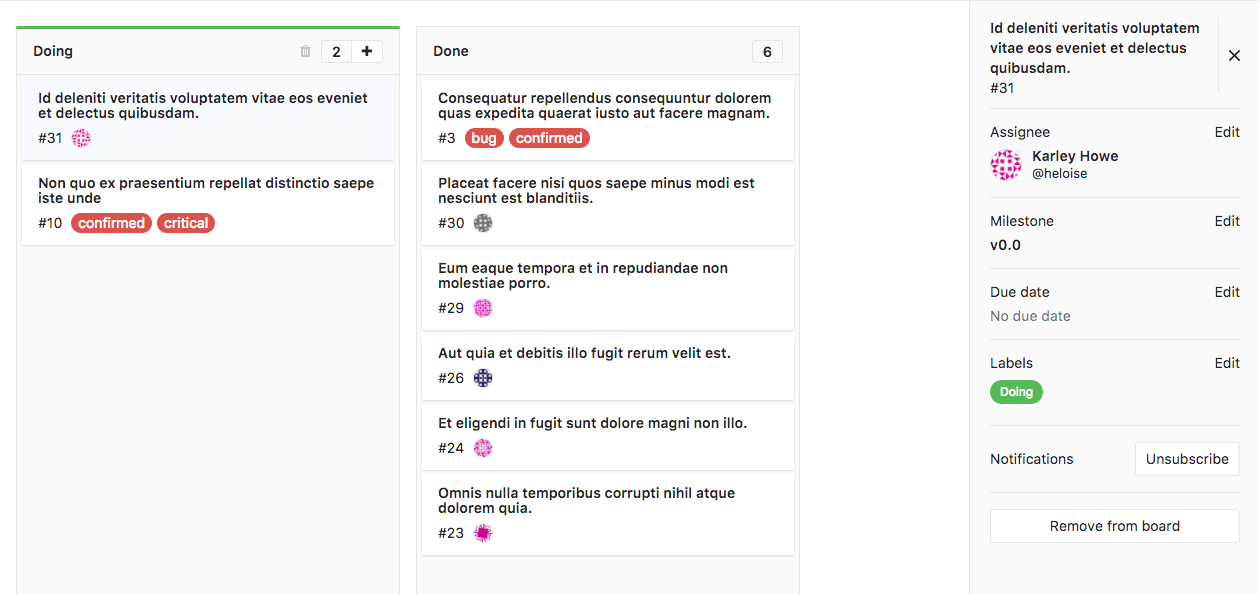
- Card - A box in the list that represents an individual issue. The information you can see on a card consists of the issue number, the issue title, the assignee, and the labels associated with the issue. You can drag cards from one list to another to change their label or assignee from that of the source list to that of the destination list.
Permissions
Reporters and up can use all the functionality of the Issue Board, that is, create or delete lists and drag issues from one list to another.
GitLab Enterprise features for Issue Boards
GitLab Issue Boards are available on GitLab Core and GitLab.com Free, but some advanced functionalities are only present in higher tiers: GitLab.com Bronze, Silver, or Gold, or GitLab self-managed Starter, Premium, and Ultimate, as described on the following sections.
For a collection of features per tier, check the summary below.
Multiple Issue Boards (STARTER)
Introduced in GitLab Enterprise Edition 8.13.
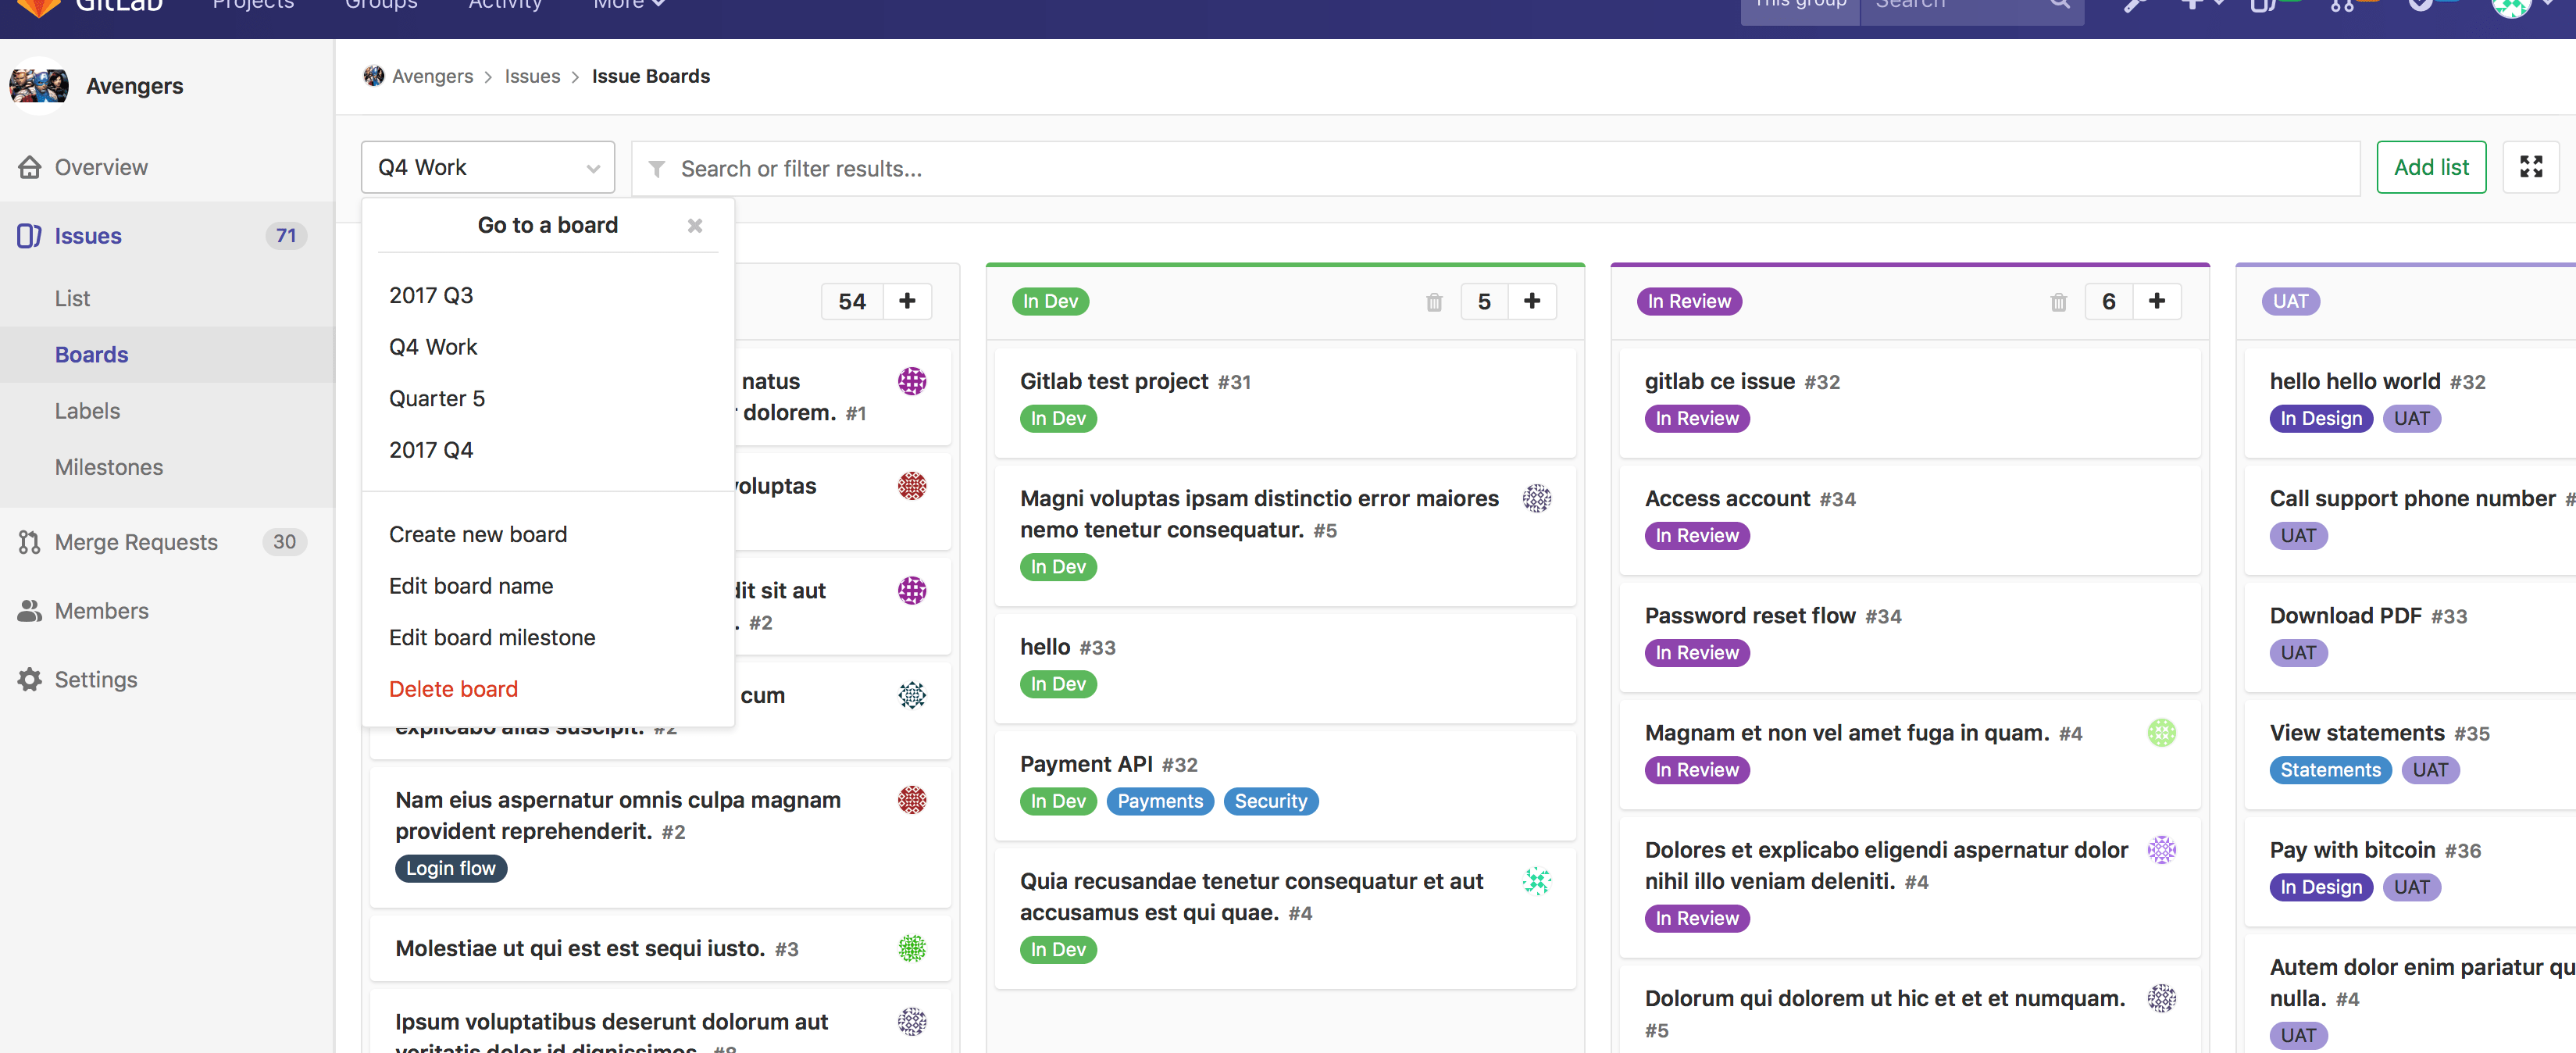
Multiple Issue Boards, as the name suggests, allow for more than one Issue Board for a given project or group. This is great for large projects with more than one team or in situations where a repository is used to host the code of multiple products.
Clicking on the current board name in the upper left corner will reveal a menu from where you can create another Issue Board or delete the existing one. Using the search box at the top of the menu, you can filter the listed boards.
When you have 10 or more boards available, a "Recent" section is also shown in the menu. These are shortcuts to your last 4 visited boards.
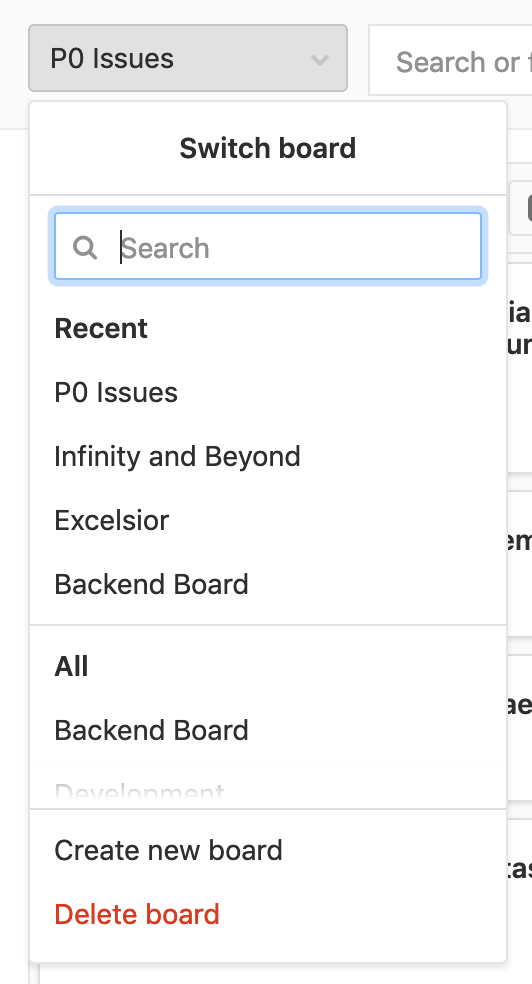
When you're revisiting an issue board in a project or group with multiple boards, GitLab will automatically load the last board you visited.
NOTE: Note: The Multiple Issue Boards feature is available for projects in GitLab Starter Edition and for groups in GitLab Premium Edition.
Configurable Issue Boards (STARTER)
Introduced in GitLab Starter Edition 10.2.
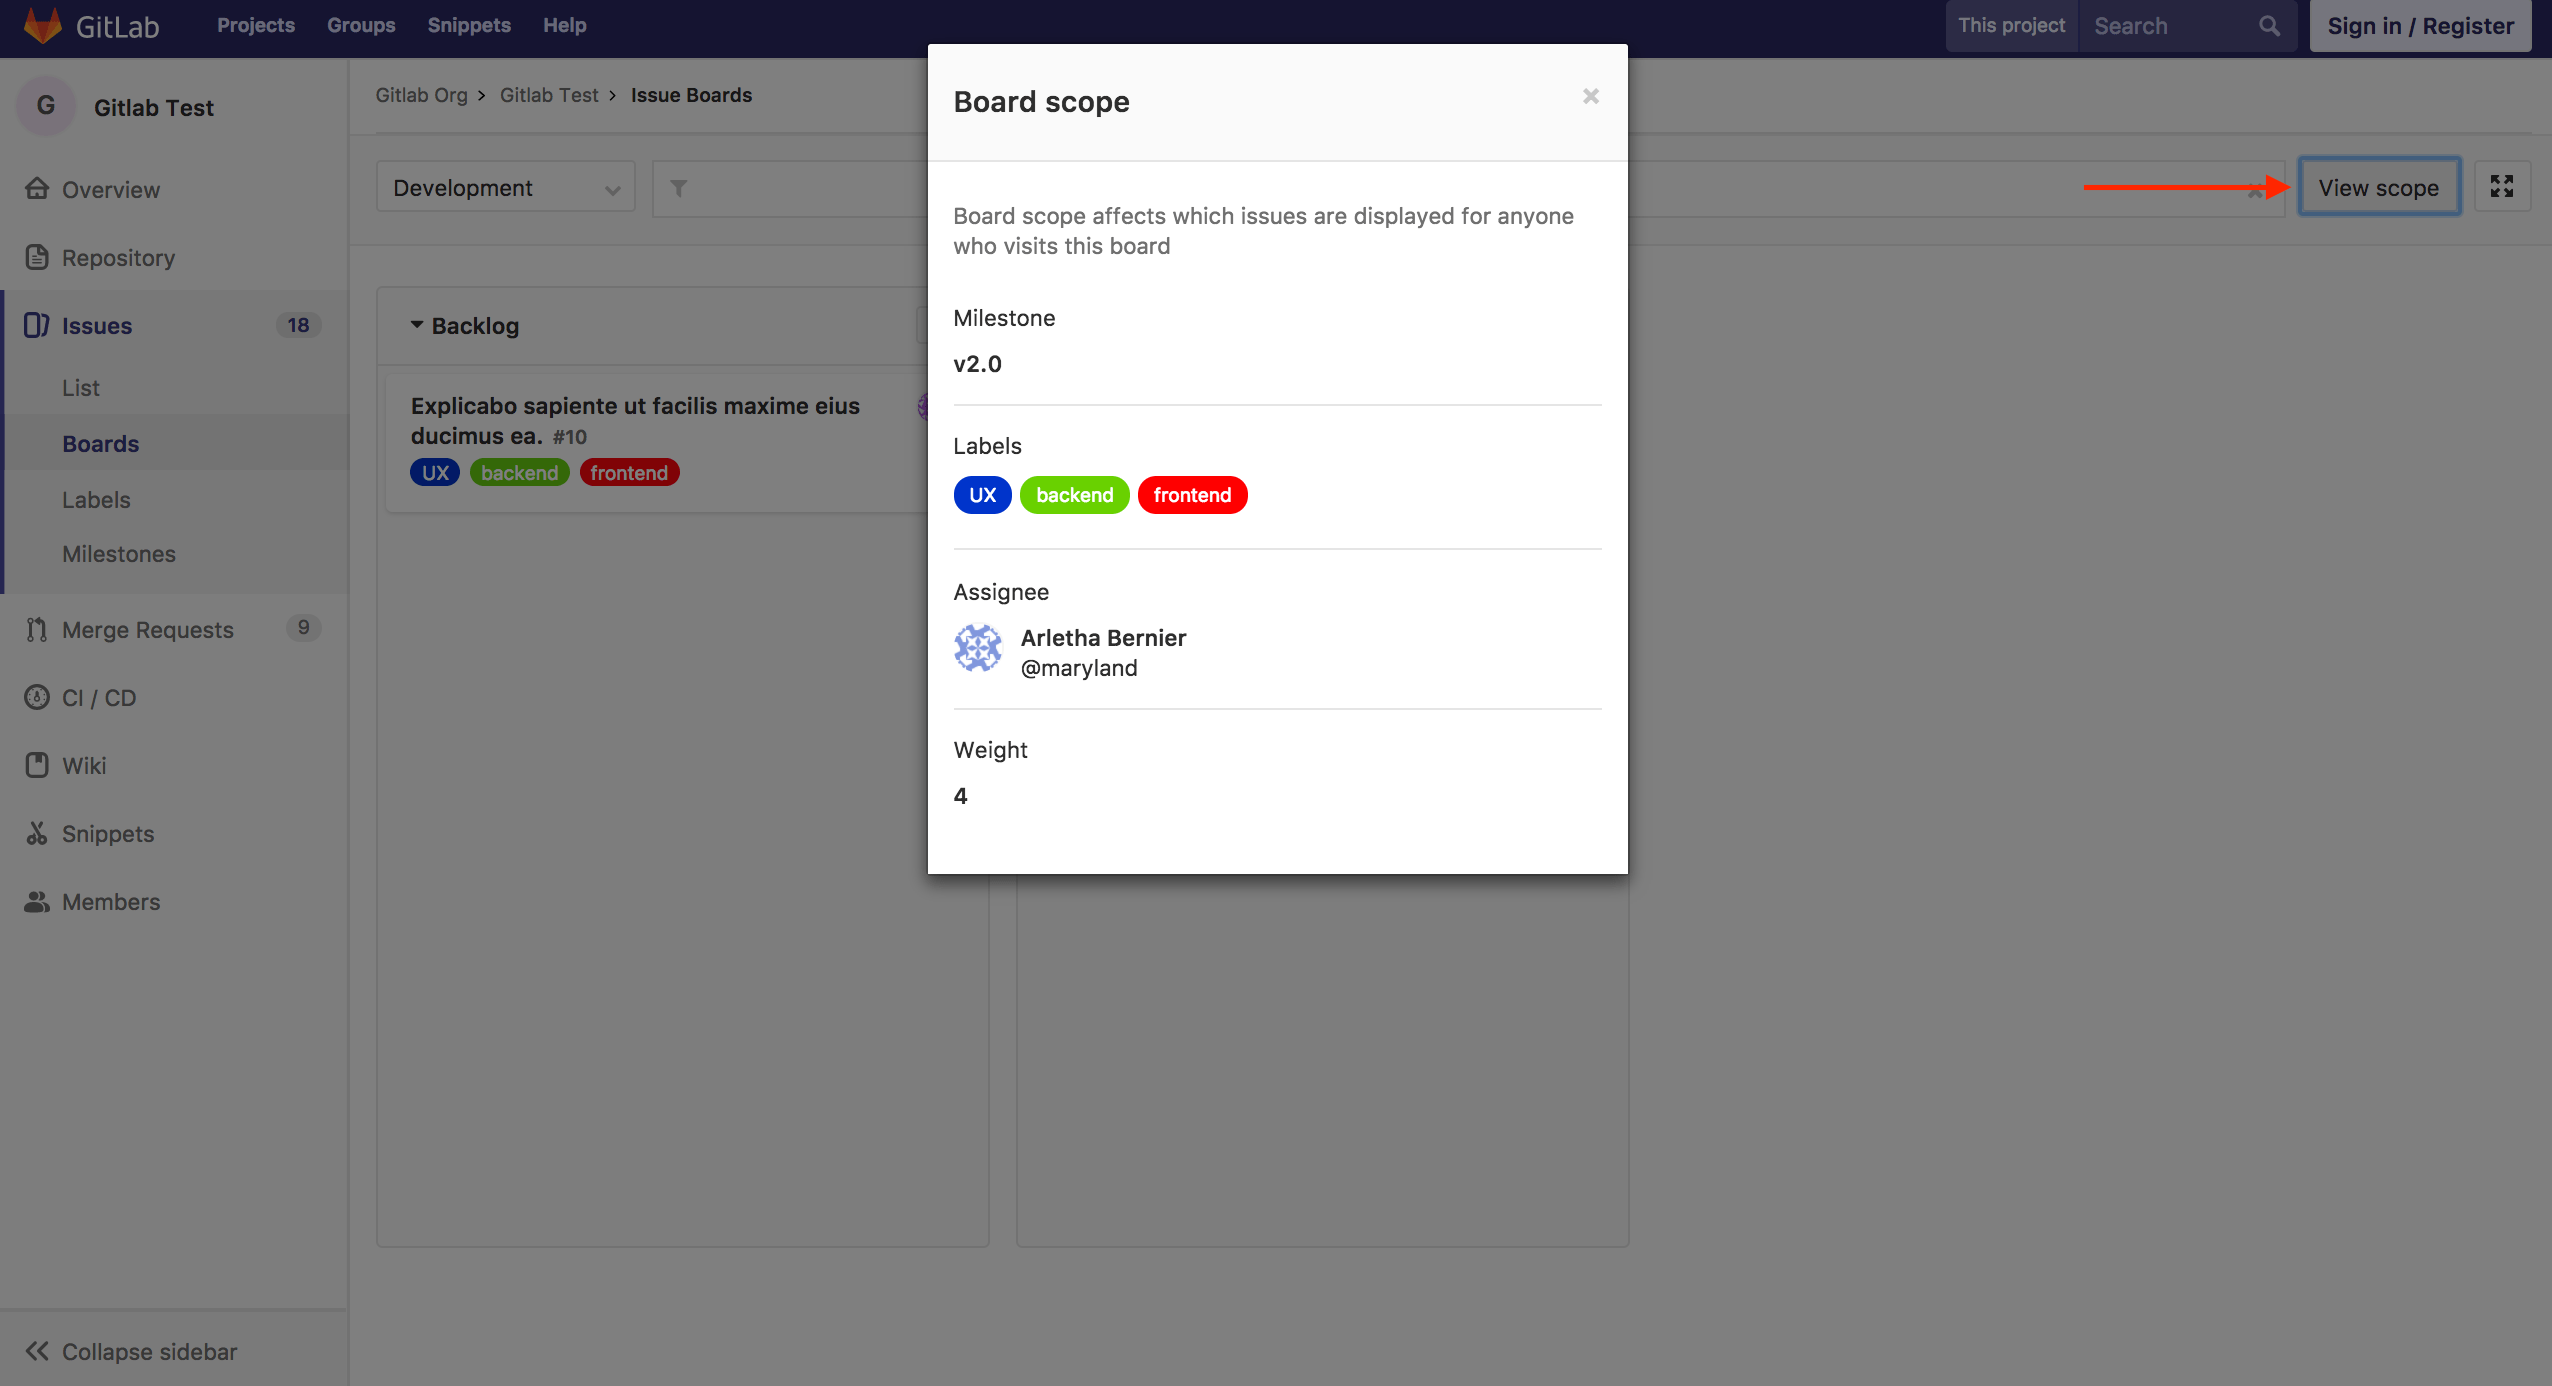
An Issue Board can be associated with a GitLab Milestone, Labels, Assignee and Weight which will automatically filter the Board issues according to these fields. This allows you to create unique boards according to your team's need.

You can define the scope of your board when creating it or by clicking on the "Edit board" button. Once a milestone, assignee or weight is assigned to an Issue Board, you will no longer be able to filter through these in the search bar. In order to do that, you need to remove the desired scope (e.g. milestone, assignee or weight) from the Issue Board.
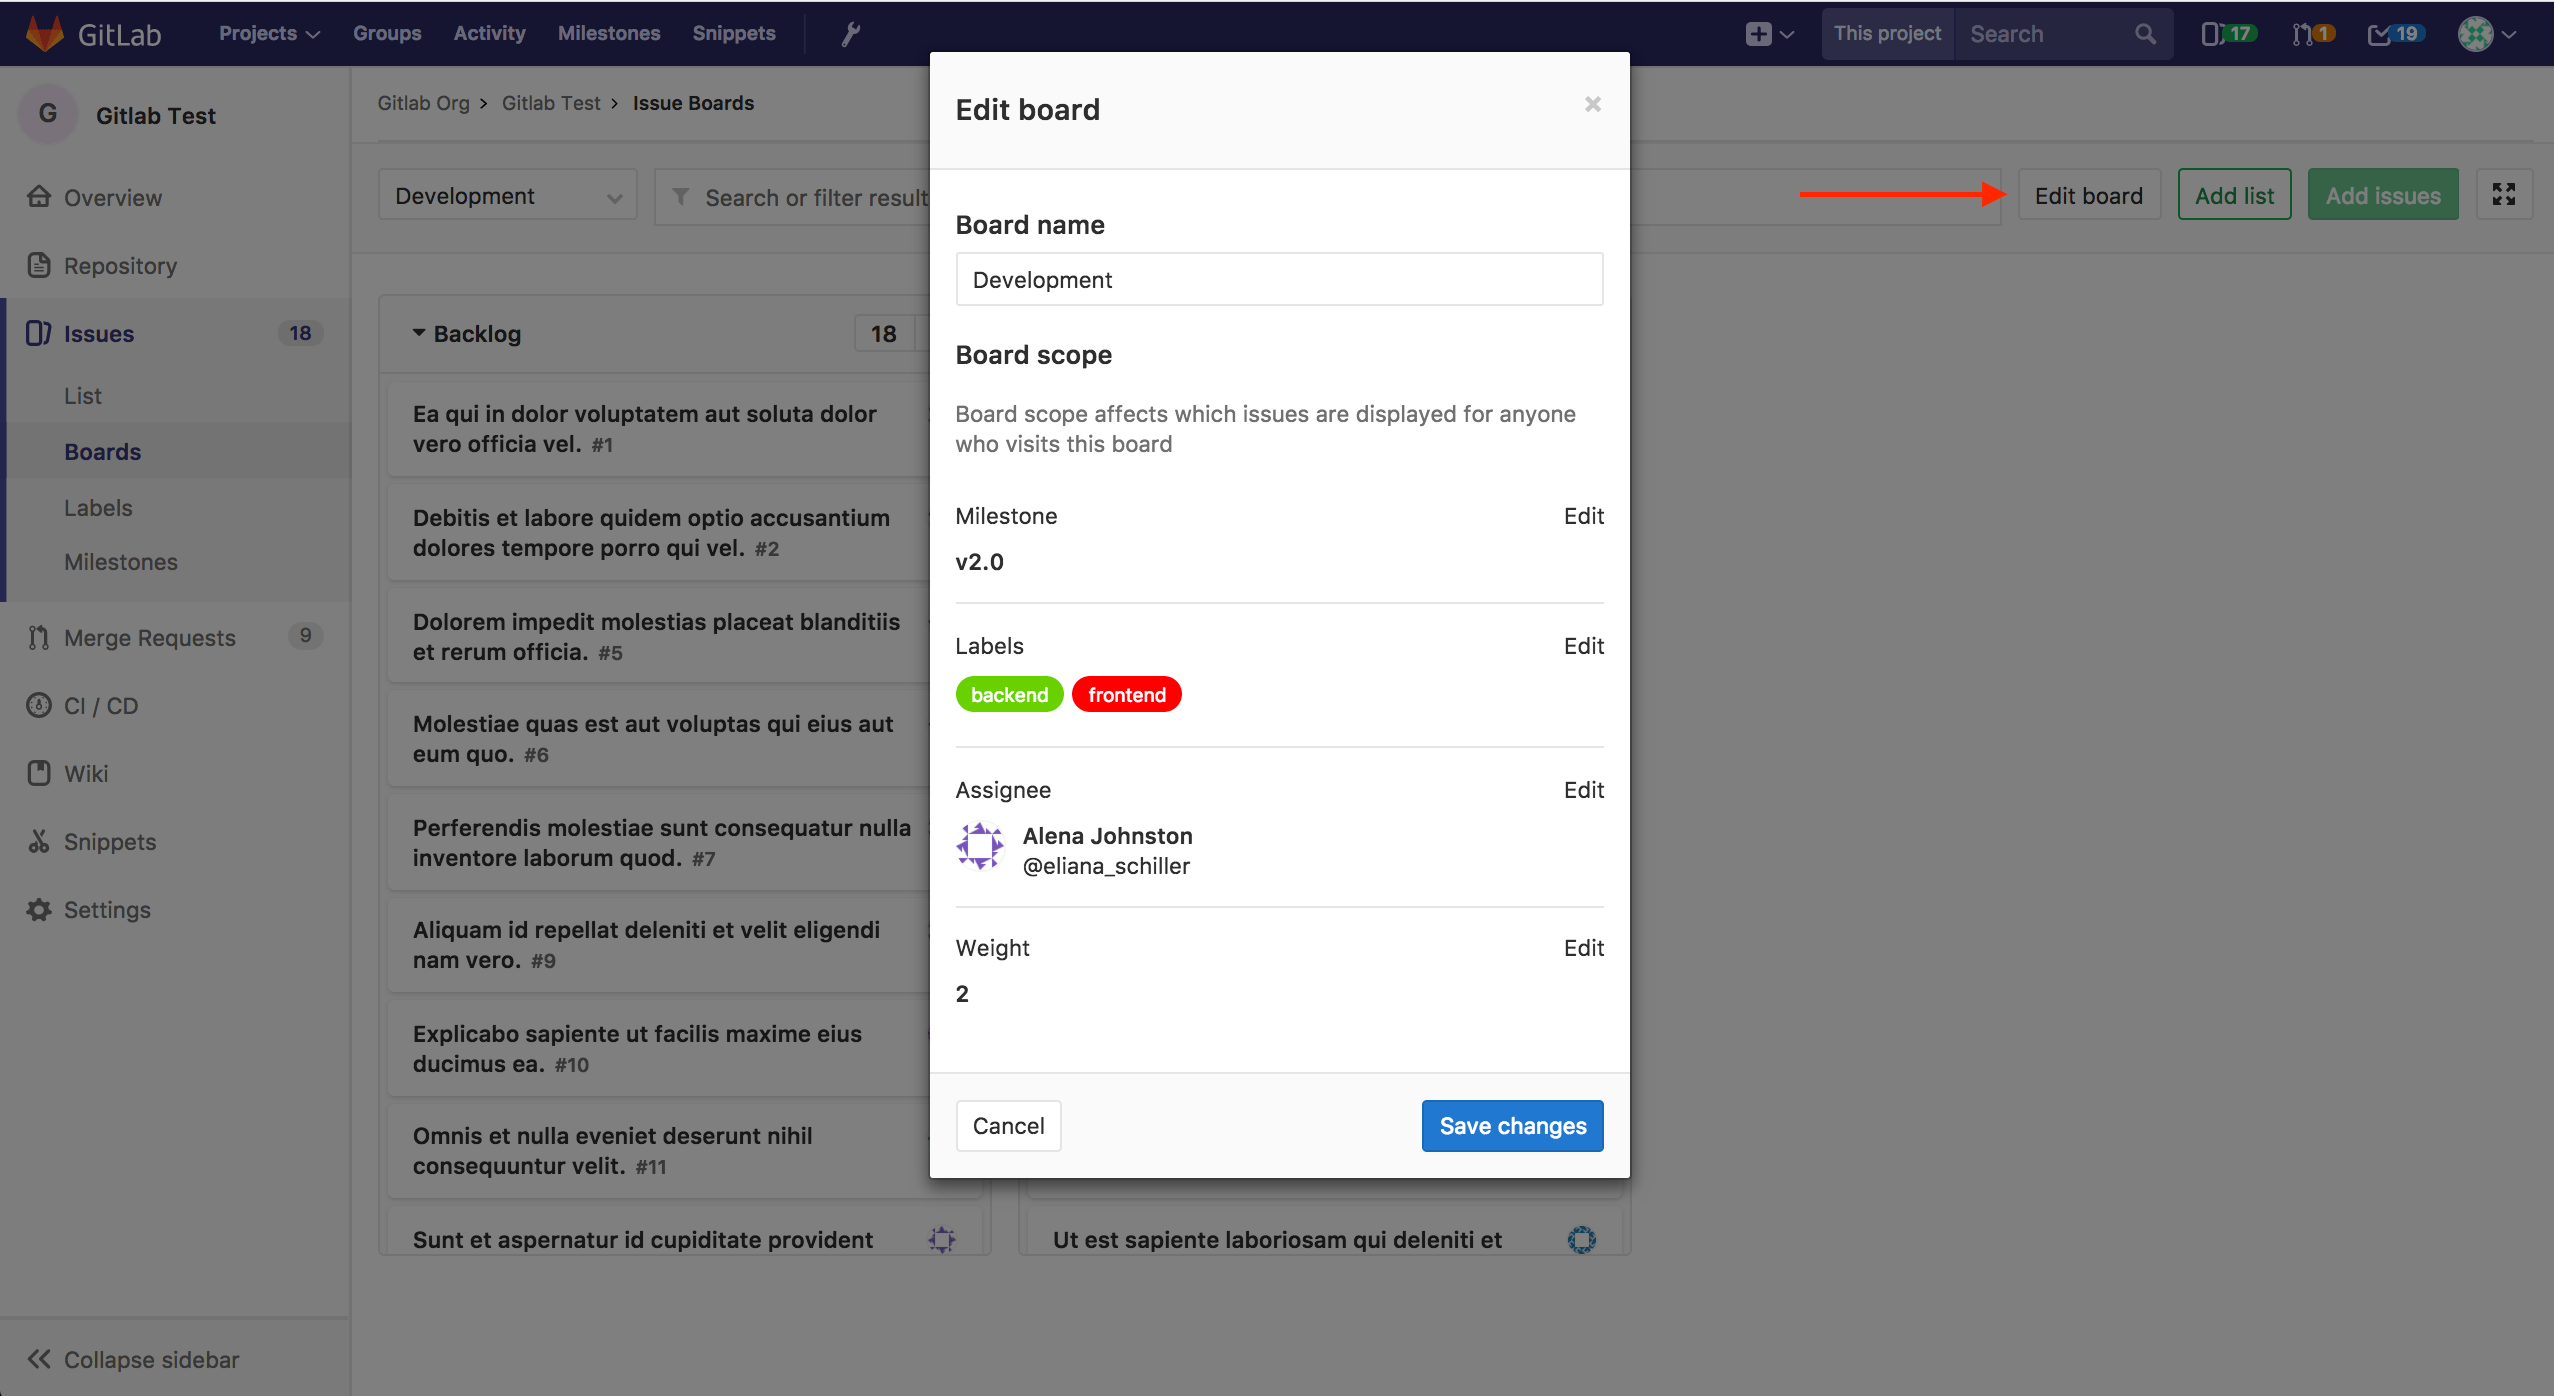
If you don't have editing permission in a board, you're still able to see the configuration by clicking on "View scope".
Focus mode (STARTER)
Introduced in GitLab Starter 9.1.
Click the button at the top right to toggle focus mode on and off. In focus mode, the navigation UI is hidden, allowing you to focus on issues in the board.
Sum of Issue Weights (STARTER)
The top of each list indicates the sum of issue weights for the issues that belong to that list. This is useful when using boards for capacity allocation, especially in combination with assignee lists.

Group Issue Boards (PREMIUM)
Introduced in GitLab Premium 10.0.
Accessible at the group navigation level, a group issue board offers the same features as a project-level board, but it can display issues from all projects in that group and its descendant subgroups. Similarly, you can only filter by group labels for these boards. When updating milestones and labels for an issue through the sidebar update mechanism, again only group-level objects are available.
NOTE: Note: Multiple group issue boards were originally introduced in GitLab 10.0 Premium and one group issue board per group was made available in GitLab 10.6 Core.
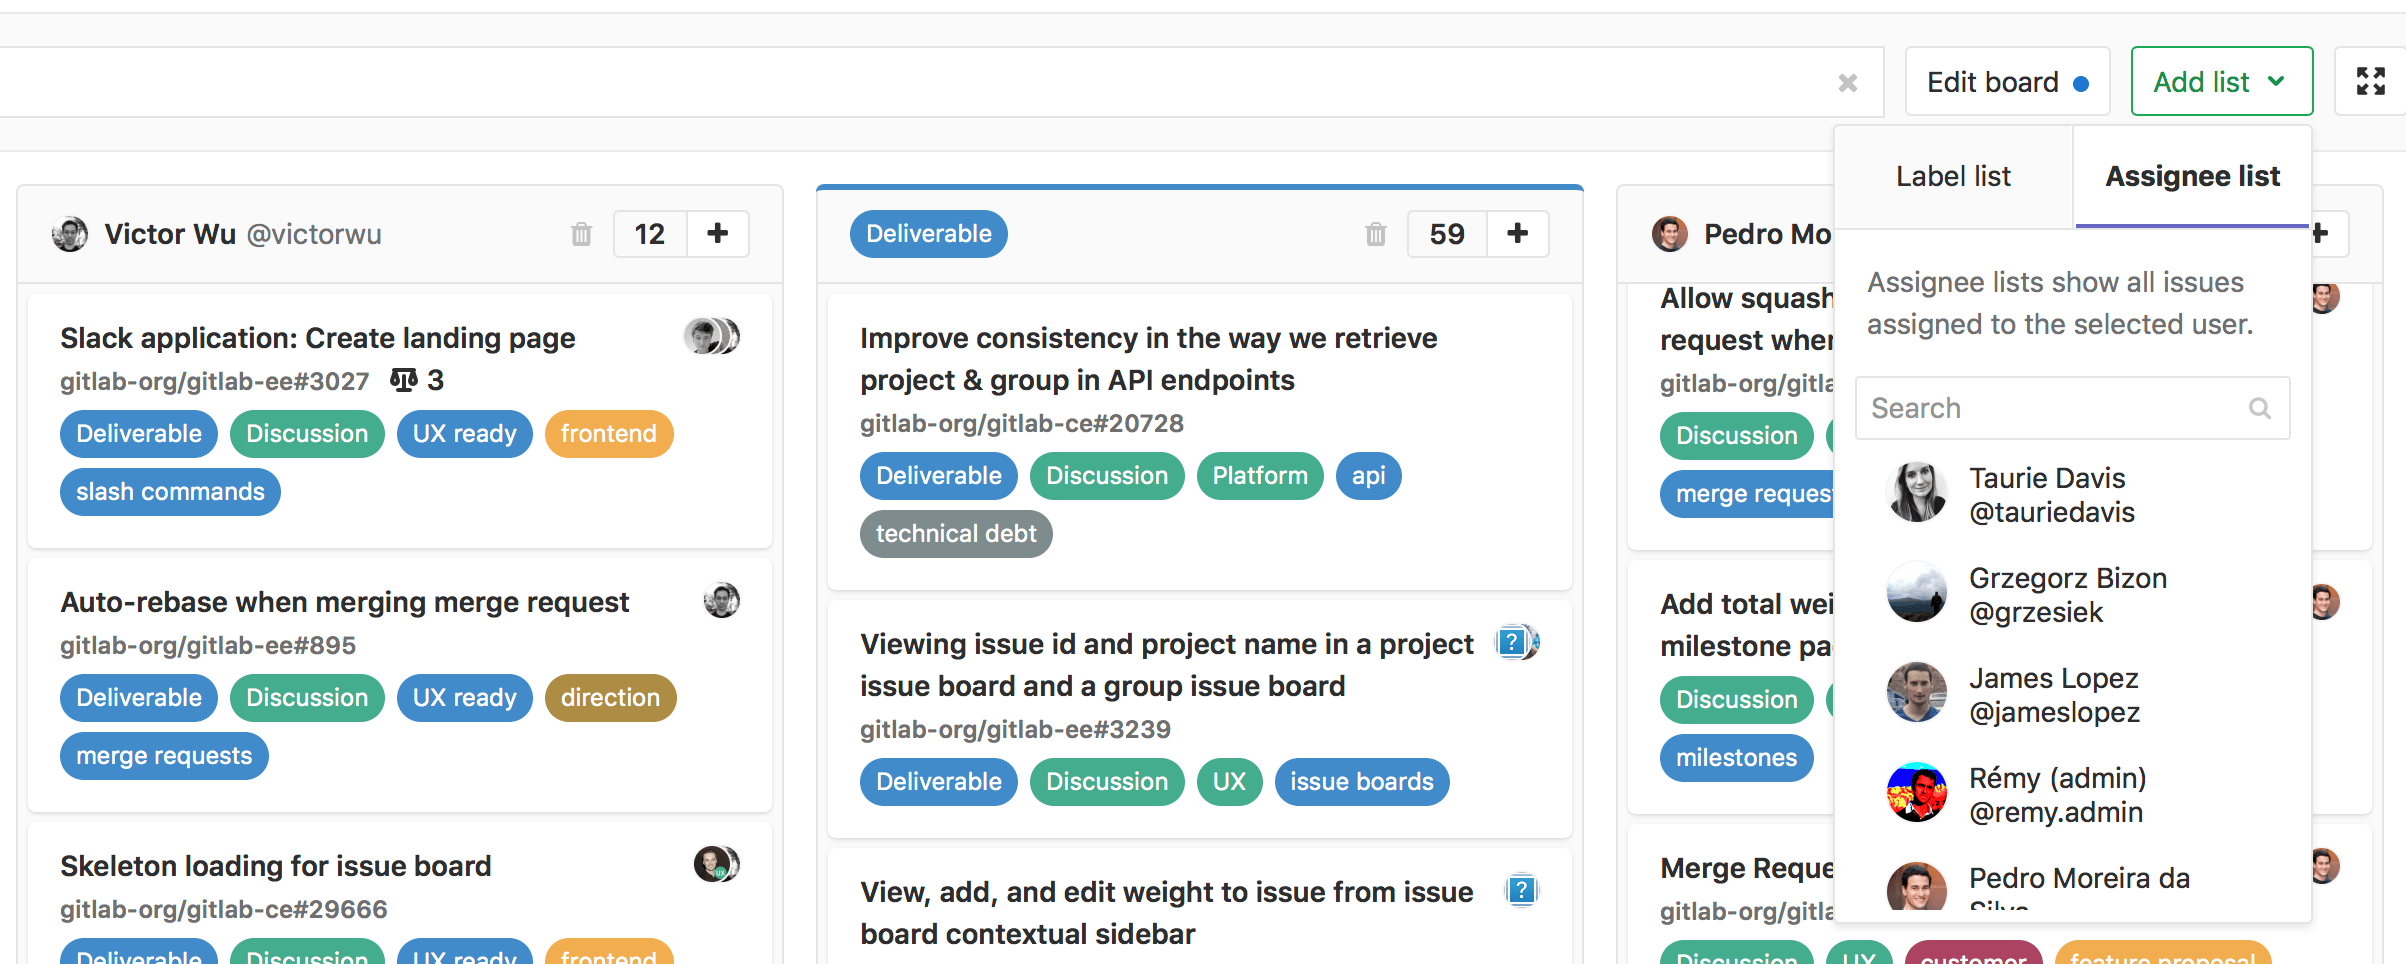
Assignee lists (PREMIUM)
Introduced in GitLab 11.0 Premium.
Like a regular list that shows all issues that have the list label, you can add an assignee list that shows all issues assigned to the given user. You can have a board with both label lists and assignee lists. To add an assignee list:
- Click Add list.
- Select the Assignee list tab.
- Search and click on the user you want to add as an assignee.
Now that the assignee list is added, you can assign or unassign issues to that user by dragging issues to and/or from an assignee list. To remove an assignee list, just as with a label list, click the trash icon.
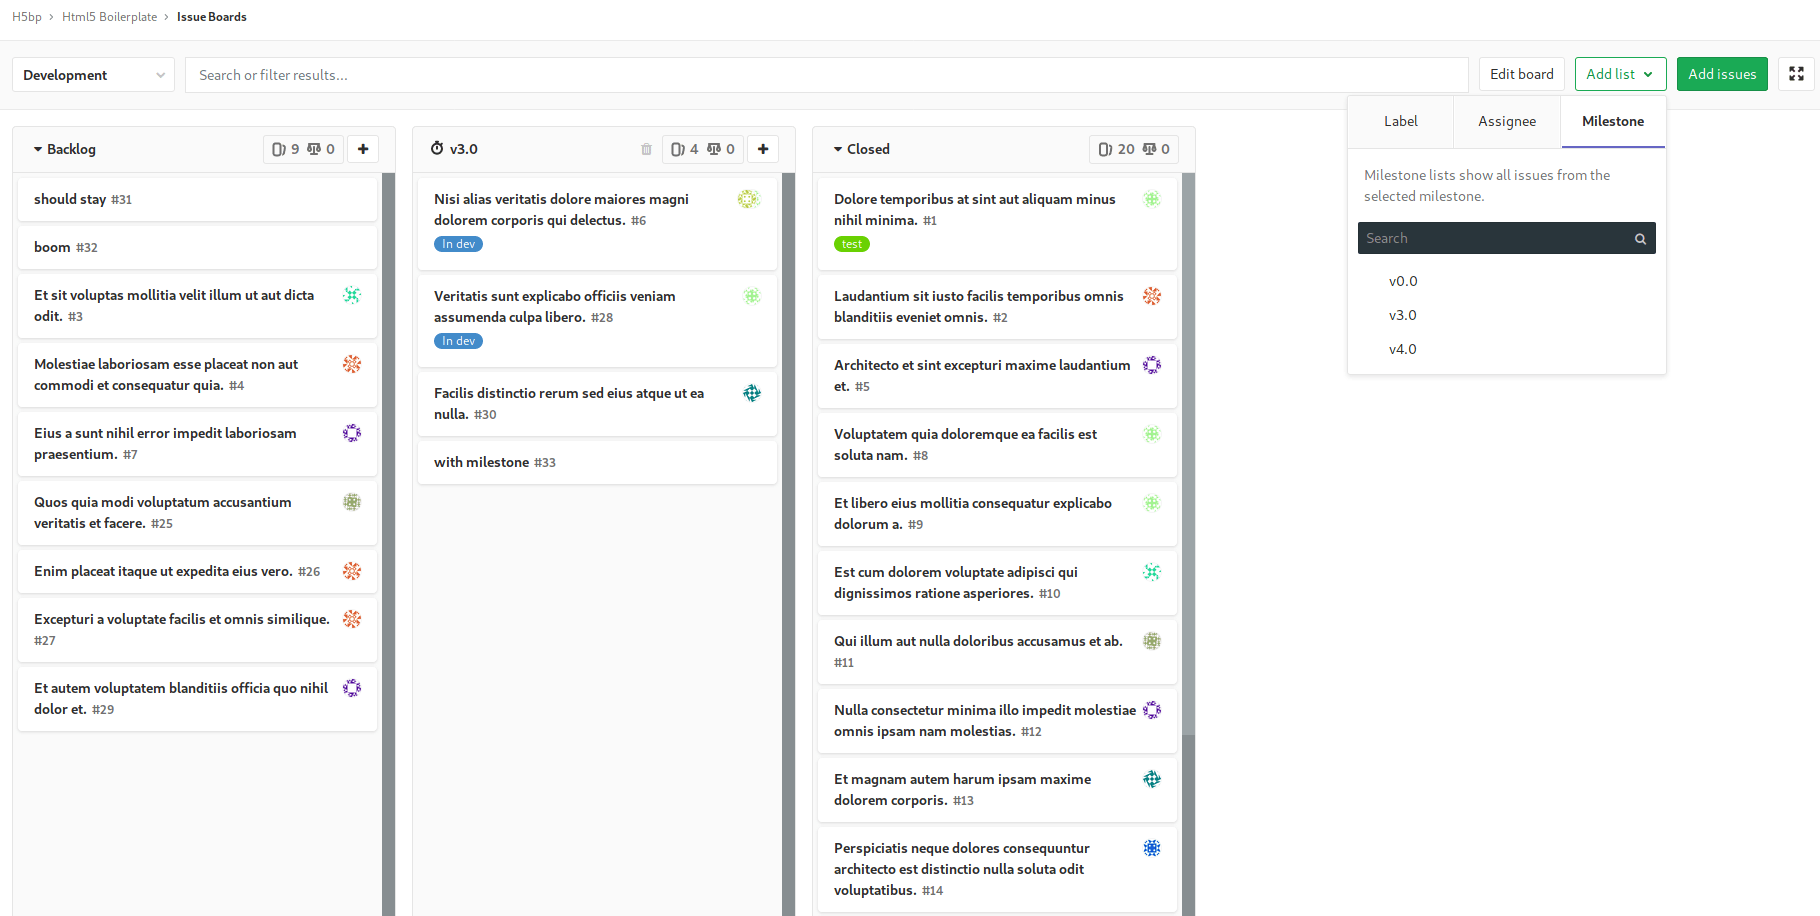
Milestone lists (PREMIUM)
Introduced in GitLab 11.2 Premium.
As of 11.2, you're also able to create lists of a milestone. As the name states, these are lists that filter issues by the assigned milestone, giving you more freedom and visibility on the Issue Board. To do so:
- Click Add list.
- Select the Milestone tab.
- Search and click on the milestone.
Similar to the assignee lists, you're now able to drag issues to and/or from a milestone list to manipulate the milestone of the dragged issues. As on another list types, click on the trash icon to remove it.
Summary of features per tier
Different issue board features are available in different GitLab tiers, as shown in the following table:
| Tier | Number of Project Issue Boards | Number of Group Issue Boards | Configurable Issue Boards | Assignee Lists |
|---|---|---|---|---|
| Core / Free | 1 | 1 | No | No |
| Starter / Bronze | Multiple | 1 | Yes | No |
| Premium / Silver | Multiple | Multiple | Yes | Yes |
| Ultimate / Gold | Multiple | Multiple | Yes | Yes |
Actions you can take on an Issue Board
- Create a new list.
- Delete an existing list.
- Drag issues between lists.
- Re-order issues in lists.
- Drag and reorder the lists themselves.
- Change issue labels on-the-fly while dragging issues between lists.
- Close an issue if you drag it to the Done list.
- Create a new list from a non-existing label by creating the label on-the-fly within the Issue Board.
- Filter issues that appear across your Issue Board.
If you are not able to perform one or more of the things above, make sure you have the right permissions.
First time using the Issue Board
The first time you navigate to your Issue Board, you will be presented with a default list (Done) and a welcoming message that gives you two options. You can either create a predefined set of labels and create their corresponding lists to the Issue Board or opt-out and use your own lists.
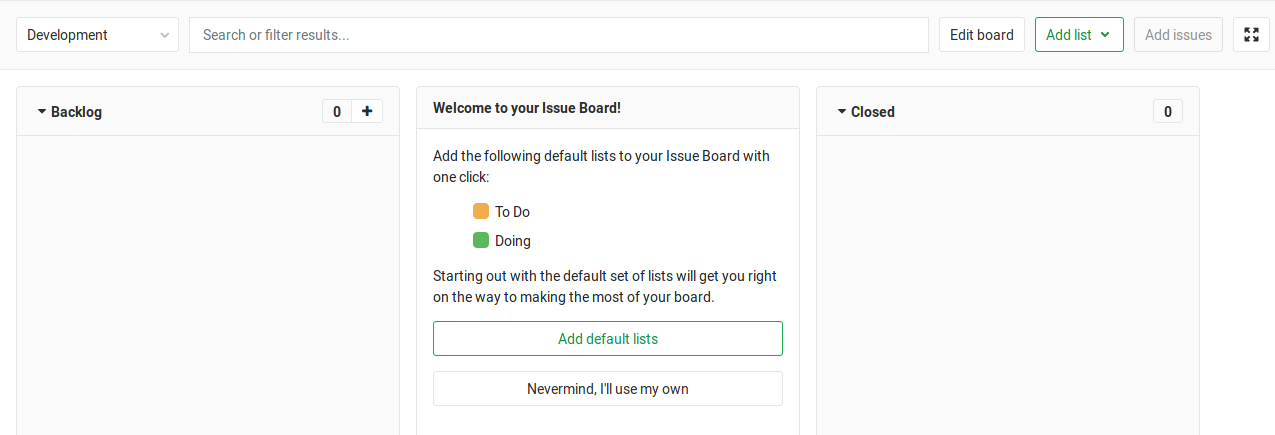
If you choose to use and create the predefined lists, they will appear as empty because the labels associated to them will not exist up until that moment, which means the system has no way of populating them automatically. That's of course if the predefined labels don't already exist. If any of them does exist, the list will be created and filled with the issues that have that label.
Creating a new list
Create a new list by clicking on the Add list button at the upper right corner of the Issue Board.
Simply choose the label or user to create the list from. The new list will be inserted at the end of the lists, before Done. Moving and reordering lists is as easy as dragging them around.
To create a list for a label that doesn't yet exist, simply create the label by choosing Create new label. The label will be created on-the-fly and it will be immediately added to the dropdown. You can now choose it to create a list.
Deleting a list
To delete a list from the Issue Board use the small trash icon that is present in the list's heading. A confirmation dialog will appear for you to confirm.
Deleting a list doesn't have any effect in issues and labels, it's just the list view that is removed. You can always add it back later if you need.
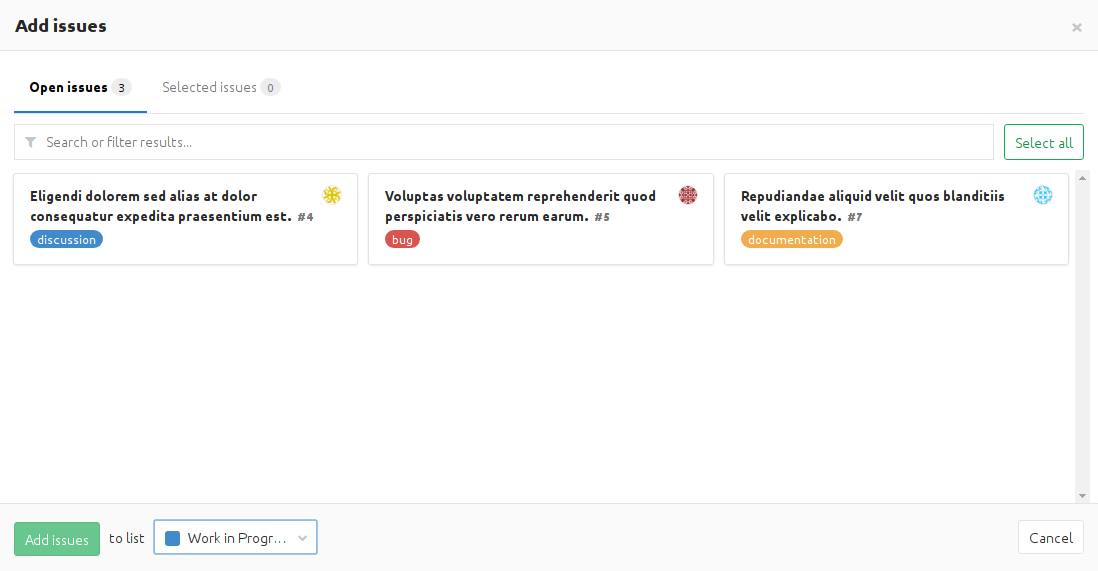
Adding issues to a list
You can add issues to a list by clicking the Add issues button that is present in the upper right corner of the Issue Board. This will open up a modal window where you can see all the issues that do not belong to any list.
Select one or more issues by clicking on the cards and then click Add issues to add them to the selected list. You can limit the issues you want to add to the list by filtering by author, assignee, milestone and label.
Removing an issue from a list
Removing an issue from a list can be done by clicking on the issue card and then clicking the Remove from board button in the sidebar. Under the hood, the respective label is removed, and as such it's also removed from the list and the board itself.
Issue ordering in a list
When visiting a board, issues appear ordered in any list. You are able to change that order simply by dragging and dropping the issues. The changed order will be saved to the system so that anybody who visits the same board later will see the reordering, with some exceptions.
The first time a given issue appears in any board (i.e. the first time a user loads a board containing that issue), it will be ordered with respect to other issues in that list according to Priority order.
At that point, that issue will be assigned a relative order value by the system representing its relative order with respect to the other issues in the list. Any time you drag-and-drop reorder that issue, its relative order value will change accordingly.
Also, any time that issue appears in any board when it is loaded by a user,
the updated relative order value will be used for the ordering. (It's only the first
time an issue appears that it takes from the Priority order mentioned above.) This means that
if issue A is drag-and-drop reordered to be above issue B by any user in
a given board inside your GitLab instance, any time those two issues are subsequently
loaded in any board in the same instance (could be a different project board or a different group board, for example),
that ordering will be maintained.
This ordering also affects issue lists. Changing the order in an issue board changes the ordering in an issue list, and vice versa.
Filtering issues
You should be able to use the filters on top of your Issue Board to show only the results you want. This is similar to the filtering used in the issue tracker since the metadata from the issues and labels are re-used in the Issue Board.
You can filter by author, assignee, milestone and label.
Creating workflows
By reordering your lists, you can create workflows. As lists in Issue Boards are based on labels, it works out of the box with your existing issues. So if you've already labeled things with 'Backend' and 'Frontend', the issue will appear in the lists as you create them. In addition, this means you can easily move something between lists by changing a label.
A typical workflow of using the Issue Board would be:
- You have created and prioritized labels so that you can easily categorize your issues.
- You have a bunch of issues (ideally labeled).
- You visit the Issue Board and start creating lists to create a workflow.
- You move issues around in lists so that your team knows who should be working on what issue.
- When the work by one team is done, the issue can be dragged to the next list so someone else can pick up.
- When the issue is finally resolved, the issue is moved to the Done list and gets automatically closed.
For instance you can create a list based on the label of 'Frontend' and one for 'Backend'. A designer can start working on an issue by adding it to the 'Frontend' list. That way, everyone knows that this issue is now being worked on by the designers. Then, once they're done, all they have to do is drag it over to the next list, 'Backend', where a backend developer can eventually pick it up. Once they’re done, they move it to Done, to close the issue.
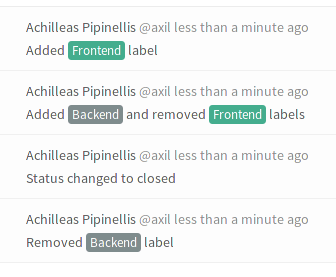
This process can be seen clearly when visiting an issue since with every move to another list the label changes and a system not is recorded.
Dragging issues between lists
When dragging issues between lists, different behavior occurs depending on the source list and the target list.
| To Open | To Closed | To label B list |
To assignee Bob list |
|
|---|---|---|---|---|
| From Open | - | Issue closed |
B added |
Bob assigned |
| From Closed | Issue reopened | - | Issue reopenedB added |
Issue reopenedBob assigned |
From label A list |
A removed |
Issue closed |
A removedB added |
Bob assigned |
From assignee Alice list |
Alice unassigned |
Issue closed |
B added |
Alice unassignedBob assigned |
Tips
A few things to remember:
- Moving an issue between lists removes the label from the list it came from and adds the label from the list it goes to.
- An issue can exist in multiple lists if it has more than one label.
- Lists are populated with issues automatically if the issues are labeled.
- Clicking on the issue title inside a card will take you to that issue.
- Clicking on a label inside a card will quickly filter the entire Issue Board and show only the issues from all lists that have that label.
- For performance and visibility reasons, each list shows the first 20 issues by default. If you have more than 20 issues start scrolling down and the next 20 will appear.